升级Spring Security OAuth到Spring Security
January 13, 2022
注: 如果只想看代码,请移步这里
上一篇完成了Gateway相关部件的更新,本以为没事了,可是Security又有问题:
2022-01-12 14:50:41.716 ERROR [auth-service,354d1a5f8ec29f97,18024b06d903b198] 20172 --- [nio-5000-exec-2] o.a.c.c.C.[.[.[.[dispatcherServlet]      : Servlet.service() for servlet [dispatcherServlet] in context with path [/uaa] threw exception [Request processing failed; nested exception is java.lang.IllegalArgumentException: Failed to evaluate expression '#oauth2.hasScope('server')'] with root cause

org.springframework.expression.spel.SpelEvaluationException: EL1011E: Method call: Attempted to call method hasScope(java.lang.String) on null context object
at org.springframework.expression.spel.ast.MethodReference.throwIfNotNullSafe(MethodReference.java:154) ~[spring-expression-5.3.14.jar:5.3.14]原因在这(Spring Security OAuth 2.x to Spring Security 5.x):
Spring Security converts scopes that follow the granted authority naming convention. To authorize requests or methods based on scope, you write an expression like hasAuthority(“SCOPE_scope”).
所以要把所有的#oauth2.hasScope('server') 更改为hasAuthority('SCOPE_server')
完成之后,确实工作了,可是被拒绝(403 Error)。如下:
2022-01-12 15:32:09.896 ERROR [account-service,95c58f5219e6dde1,66f7867f03f9fe8e] 28016 --- [nio-6000-exec-1] o.a.c.c.C.[.[.[.[dispatcherServlet]      : Servlet.service() for servlet [dispatcherServlet] in context with path [/accounts] threw exception [Request processing failed; nested exception is org.springframework.cloud.client.circuitbreaker.NoFallbackAvailableException: No fallback available.] with root cause

feign.FeignException$Forbidden: [403] during [POST] to [http://auth-service/uaa/users] [AuthServiceClient#createUser(User)]: [{"error":"access_denied","error_description":"Access is denied"}]
	at feign.FeignException.clientErrorStatus(FeignException.java:217) ~[feign-core-11.7.jar:na]
原因是使用了新版的Spring Security,而Feign对Oauth2的支持在新版本中不再有用,也就是说,token relay不行了,无法把token从Account Service转到Auth Sercie。这篇文章解释的好。
这个问题归根到底还是由于混用最新的Spring Cloud和要退休的Spring Security Oauth2混用造成的,因为在最新的Spring中,已经把Spring Security OAuth2都迁移到Spring Security中去了,所以应该抛弃所有Spring Security OAuth2相关依赖。如下:
移除:
    <dependency>
        <groupId>org.springframework.cloud</groupId>
        <artifactId>spring-cloud-starter-oauth2</artifactId>
        <version>2.2.5.RELEASE</version>
    </dependency>
接下来就要更改代码了,因为新版Spring Security对OAuth2的支持是重新写的,所以之前那些@EnableResourceServer、OAuth2RestTemplate、@EnableOAuth2Client都不再被支持,因为需要相应地大幅修改代码。写到这里不由地感叹下,之前Hoxton版本的piggymetrics真的已经比较完善了,除非特别需要紧跟Spring Cloud的脚步,否则真没有必要像我一样来踩这么多的坑。
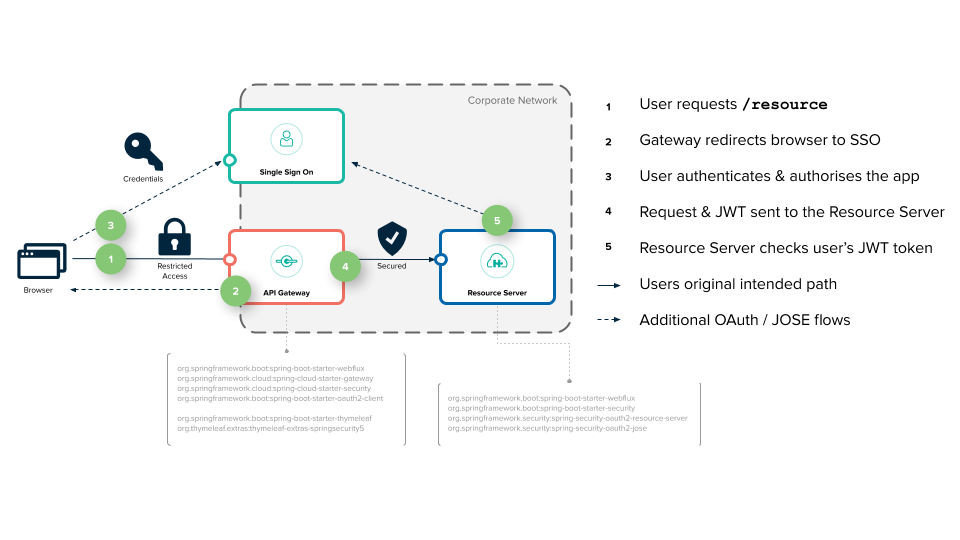
Authorizaiton Server
在新版本的Security中,已经单独把Authorization Server作为一个组件来看待,之前在Spring Security OAuth2中还只是用一个Annotation @EnableAuthorizationServer。我决定采用新成立的Spring Security Authorization Server,因为它已经发布生产版本了,相当可靠了。
增加依赖
    <dependency>
        <groupId>org.springframework.security</groupId>
        <artifactId>spring-security-oauth2-authorization-server</artifactId>
        <version>0.2.1</version>
    </dependency>
这个依赖自动把Spring Security中关于Oauth2的resource-server/client/jose都包含进来了。
在代码方面
用新的方式配置Repository,注意下面已经import了默认OAuth2AuthorizationServerConfiguration,不需要额外设置SecurityFilterChain, 否则就会出现403错误。这是大半天的教训。
@Configuration
@Import(OAuth2AuthorizationServerConfiguration.class)
public class OAuth2AuthorizationConfig {
	@Bean
	public RegisteredClientRepository registeredClientRepository() {
		RegisteredClient uiClient = RegisteredClient.withId(UUID.randomUUID().toString())
				.clientId("browser")
				.authorizationGrantType(AuthorizationGrantType.PASSWORD)
				.authorizationGrantType(AuthorizationGrantType.REFRESH_TOKEN)
				.scope("ui")
				.build();

		RegisteredClient accountClient = RegisteredClient.withId(UUID.randomUUID().toString())
				.clientId("account-service")
				.clientSecret("{noop}account_secret")
				.clientAuthenticationMethod(ClientAuthenticationMethod.CLIENT_SECRET_BASIC)
				.authorizationGrantType(AuthorizationGrantType.CLIENT_CREDENTIALS)
				.authorizationGrantType(AuthorizationGrantType.REFRESH_TOKEN)
				.scope("server")
				.build();

		RegisteredClient statisticsClient = RegisteredClient.withId(UUID.randomUUID().toString())
				.clientId("statistics-service")
				.clientSecret("{noop}stat_secret")
				.clientAuthenticationMethod(ClientAuthenticationMethod.CLIENT_SECRET_BASIC)
				.authorizationGrantType(AuthorizationGrantType.CLIENT_CREDENTIALS)
				.authorizationGrantType(AuthorizationGrantType.REFRESH_TOKEN)
				.scope("server")
				.build();

		RegisteredClient notificationClient = RegisteredClient.withId(UUID.randomUUID().toString())
				.clientId("notification-service")
				.clientSecret("{noop}notification_secret")
				.clientAuthenticationMethod(ClientAuthenticationMethod.CLIENT_SECRET_BASIC)
				.authorizationGrantType(AuthorizationGrantType.CLIENT_CREDENTIALS)
				.authorizationGrantType(AuthorizationGrantType.REFRESH_TOKEN)
				.scope("server")
				.build();

		return new InMemoryRegisteredClientRepository(uiClient, accountClient, statisticsClient, notificationClient);
	}
}
由于所有的配置都写在代码里面了,所以没有配置文件方面的更改。
ResourceServer / OAuth2 Client
增加依赖
    <dependency>
        <groupId>org.springframework.boot</groupId>
        <artifactId>spring-boot-starter-oauth2-resource-server</artifactId>
    </dependency>

    <dependency>
        <groupId>org.springframework.boot</groupId>
        <artifactId>spring-boot-starter-oauth2-client</artifactId>
    </dependency>
因为Account, statistics, notification三个服务组件即是Resource Server,同时又是Client,所以放在一起配置。
Resource Server
配置文件:
spring:
  security:
    oauth2:
      resourceserver:
        jwt:
          jwk-set-uri: http://localhost:5000/uaa/oauth2/jwks
代码方面:
    @Bean
    SecurityFilterChain securityFilterChain(HttpSecurity http) throws Exception {
    	http
			.httpBasic().disable()
			.formLogin(AbstractHttpConfigurer::disable)
			.csrf(AbstractHttpConfigurer::disable)
			.sessionManagement(sessionManagement ->
				sessionManagement.sessionCreationPolicy(SessionCreationPolicy.STATELESS))
			.authorizeHttpRequests((authorize) -> authorize
				.antMatchers("/", "/demo").permitAll()
				.antMatchers(HttpMethod.GET, "/accounts/**").hasAuthority("SCOPE_server")
				.antMatchers(HttpMethod.POST, "/accounts/**").hasAuthority("SCOPE_server")
				.anyRequest().authenticated()
			)
			.oauth2ResourceServer(OAuth2ResourceServerConfigurer::jwt);

        return http.build();
}可以看到我们没有之前的Annotation了,用了一个oauth2ResourceServerDSL的方式。Resource Server是如何知道前来的token是否是合法的呢,关键就在于前面我们配置的jwk-set-uri,也就是说Resource Server可以直接通过这个去Authrization Server验证。
上面的配置中,一定要注意的是要把 CSRF disable了,否则就会遇到403错误。我在这个问题上浪费了好半天,主要是老版本的的EnableResourceServer就已经包含了这个含义了,而新版本中由于用到的是DSL,所有的东西都要手工添加。感谢这篇文章提醒。但在Autorization Server中用系统默认配置即可,无须额外专门设置。
Client
这个系统除了三个Service是Resource Server之外,也都是OAuth2 Client,以为他们之间要互相调用嘛。由于是中间没有人工参与,所以都是采用client_credentials的方式。
删除:
security:
  oauth2:
    client:
      clientId: account-service
      clientSecret: ${ACCOUNT_SERVICE_PASSWORD}
      accessTokenUri: http://localhost:5000/uaa/oauth/token
      grant-type: client_credentials
      scope: server
增加:
spring:
  security:
    oauth2:
      client:
        registration:
          account_service:
            provider: spring
            client-id: account-service
            client-secret: account_secret
            authorization-grant-type: client_credentials
            scope: server
        provider:
          spring:
            authorization-uri: http://localhost:5000/uaa/oauth2/authorize
            token-uri: http://localhost:5000/uaa/oauth2/token
            jwk-set-uri: http://localhost:5000/uaa/oauth2/jwks
代码方面是:
@EnableWebSecurity
public class OAuth2ClientConfig {

	@Bean
	public OAuth2AuthorizedClientManager authorizedClientManager(
			ClientRegistrationRepository clientRegistrationRepository,
			OAuth2AuthorizedClientService authorizedClientService) {

		OAuth2AuthorizedClientProvider authorizedClientProvider = OAuth2AuthorizedClientProviderBuilder.builder()
				.clientCredentials().build();

		AuthorizedClientServiceOAuth2AuthorizedClientManager authorizedClientManager = new AuthorizedClientServiceOAuth2AuthorizedClientManager(
				clientRegistrationRepository, authorizedClientService);
		authorizedClientManager.setAuthorizedClientProvider(authorizedClientProvider);

		return authorizedClientManager;
} 可以看到,仍然是采用DSLoauth2Client的方式来激活。需要注意的是在配置OAuth2AuthorizedClientManager的时候,一定要采用AuthorizedClientServiceOAuth2AuthorizedClientManager,而不要采用DefaultOAuth2AuthorizedClientManager,以为文档末尾说:
The DefaultOAuth2AuthorizedClientManager is designed to be used within the context of a HttpServletRequest. When operating outside of a HttpServletRequest context, use AuthorizedClientServiceOAuth2AuthorizedClientManager instead.
A service application is a common use case for when to use an AuthorizedClientServiceOAuth2AuthorizedClientManager. Service applications often run in the background, without any user interaction, and typically run under a system-level account instead of a user account. An OAuth 2.0 Client configured with the client_credentials grant type can be considered a type of service application.
注意在Client Config里面不需要配置SecurityFilterChain,否则就会在Feign调用其他service的时候出现403错误。(花费了半天才发现这个问题)
Token Relay
令牌中继是个问题,因为我们都是使用Feign来做调用,而Security Token还能否再新版本的Secrity框架下传递吗? 这篇文章说可以。
如果不设置令牌中继,就会遇到403错误,如下所示:
feign.FeignException$Forbidden: [403] during [POST] to [http://auth-service/uaa/users] [AuthServiceClient#createUser(User)]: []
	at feign.FeignException.clientErrorStatus(FeignException.java:217) ~[feign-core-11.7.jar:na]
	at feign.FeignException.errorStatus(FeignException.java:194) ~[feign-core-11.7.jar:na]
	at feign.FeignException.errorStatus(FeignException.java:185) ~[feign-core-11.7.jar:na]
	at feign.codec.ErrorDecoder$Default.decode(ErrorDecoder.java:92) ~[feign-core-11.7.jar:na]
	at feign.AsyncResponseHandler.handleResponse(AsyncResponseHandler.java:96) ~[feign-core-11.7.jar:na]
	at feign.SynchronousMethodHandler.executeAndDecode(SynchronousMethodHandler.java:138) ~[feign-core-11.7.jar:na]
	at feign.SynchronousMethodHandler.invoke(SynchronousMethodHandler.java:89) ~[feign-core-11.7.jar:na]
	at feign.ReflectiveFeign$FeignInvocationHandler.invoke(ReflectiveFeign.java:100) ~[feign-core-11.7.jar:na]
	at com.sun.proxy.$Proxy200.createUser(Unknown Source) ~[na:na]
	at com.piggymetrics.account.service.AccountServiceImpl.create(AccountServiceImpl.java:53) ~[classes/:na]
目前还是用老办法,手工设置header,不知道在Cirucuit Breaker的情况下还能不能用。
先创建一个Interceptor
public class OAuthRequestInterceptor implements RequestInterceptor {

	private static Logger log = LoggerFactory.getLogger(OAuthRequestInterceptor.class);

	@Inject
	private OAuth2AuthorizedClientManager oAuth2AuthorizedClientManager;

	@Override
	public void apply(RequestTemplate template) {
		template.header(HttpHeaders.AUTHORIZATION, getAuthorizationToken());
	}

	private String getAuthorizationToken() {
		OAuth2AuthorizeRequest oAuth2AuthorizeRequest = OAuth2AuthorizeRequest
				.withClientRegistrationId("account-service").principal(new AnonymousAuthenticationToken("feignClient",
						"feignClient", AuthorityUtils.createAuthorityList("ROLE_ANONYMOUS")))
				.build();
		final OAuth2AccessToken accessToken = oAuth2AuthorizedClientManager.authorize(oAuth2AuthorizeRequest)
				.getAccessToken();
		return String.format("%s %s", accessToken.getTokenType().getValue(), accessToken.getTokenValue());
	}

}
注意上面代码hard code的withClientRegistrationId("account-service") account-service 要和 配置文件中的注册名字要匹配起来。
	client:
        registration:
          *account-service:*
            provider: spring
然后放在Feign Config里面
public class FeignClientConfig {

   @Bean
   public OAuthRequestInterceptor requestInterceptor() {
       return new OAuthRequestInterceptor();
   }

}
最后在所有FeignClient上面都加上这个Config,看起来是比老的版本复杂了些。
@FeignClient(name = "auth-service", configuration = FeignClientConfig.class)
public interface AuthServiceClient {

	@RequestMapping(method = RequestMethod.POST, value = "/uaa/users", consumes = MediaType.APPLICATION_JSON_UTF8_VALUE)
	void createUser(User user);

}
结果遇到如下错误:
feign.FeignException$Forbidden: [403] during [POST] to [http://auth-service/uaa/users] [AuthServiceClient#createUser(User)]: []
	at feign.FeignException.clientErrorStatus(FeignException.java:217) ~[feign-core-11.7.jar:na]
	at feign.FeignException.errorStatus(FeignException.java:194) ~[feign-core-11.7.jar:na]
	at feign.FeignException.errorStatus(FeignException.java:185) ~[feign-core-11.7.jar:na]
	at feign.codec.ErrorDecoder$Default.decode(ErrorDecoder.java:92) ~[feign-core-11.7.jar:na]
	at feign.AsyncResponseHandler.handleResponse(AsyncResponseHandler.java:96) ~[feign-core-11.7.jar:na]
	at feign.SynchronousMethodHandler.executeAndDecode(SynchronousMethodHandler.java:138) ~[feign-core-11.7.jar:na]
	at feign.SynchronousMethodHandler.invoke(SynchronousMethodHandler.java:89) ~[feign-core-11.7.jar:na]
	at org.springframework.cloud.openfeign.FeignCircuitBreakerInvocationHandler.lambda$asSupplier$1(FeignCircuitBreakerInvocationHandler.java:112) ~[spring-cloud-openfeign-core-3.1.0.jar:3.1.0]
	at org.springframework.cloud.sleuth.instrument.circuitbreaker.TraceSupplier.get(TraceSupplier.java:52) ~[spring-cloud-sleuth-instrumentation-3.1.0.jar:3.1.0]
	at java.util.concurrent.FutureTask.run(FutureTask.java:266) ~[na:1.8.0_311]
注意这个错误栈中的是由CircuitBreaker发出的,这证实了之前的猜测,所以还是不行。在更复杂的配置之前,权宜之计,先把circuit breaker Disable。
feign:
  circuitbreaker:
enabled: false另外,如果在代码里面写密码,要用新的格式。也就是在密码前面必须要有个大括号,否则就会有下面的错误。
java.lang.IllegalArgumentException: There is no PasswordEncoder mapped for the id "null"
	at org.springframework.security.crypto.password.DelegatingPasswordEncoder$UnmappedIdPasswordEncoder.matches(DelegatingPasswordEncoder.java:254) ~[spring-security-crypto-5.6.1.jar:5.6.1]
	at org.springframework.security.crypto.password.DelegatingPasswordEncoder.matches(DelegatingPasswordEncoder.java:202) ~[spring-security-crypto-5.6.1.jar:5.6.1]
	at org.springframework.security.oauth2.server.authorization.authentication.OAuth2ClientAuthenticationProvider.authenticate(OAuth2ClientAuthenticationProvider.java:112) ~[spring-security-oauth2-authorization-server-0.2.1.jar:0.2.1]
	at org.springframework.security.authentication.ProviderManager.authenticate(ProviderManager.java:182) ~[spring-security-core-5.6.1.jar:5.6.1]
最终,终于端到端调用成功(Gateway —> Account —> Auth),最后留下几个小尾巴问题:
- circuit breaker目前不能用,因为这样就无法为其设置新的header。
- 新的Spring Authorization Server目前对Password类型的认证并不完善,因为这种类型在OAuth2 2.1中已经被抛弃了。所以具体到本项目中前台提交的表单数据会导致400错误。
curl -X POST -H "Content-Type: application/x-www-form-urlencoded" -d "scope=ui&username=yuan123457&password=1112233&grant_type=password" http://laptop-aaron:4000/uaa/oauth2/token - 不是很了解Spring Authorization Server本身的方法Security设置,目前采用的是
OAuth2AuthorizationServerConfiguration里面的配置,,注意到如果启用@EnableGlobalMethodSecurity(prePostEnabled = true)/@PreAuthorize("hasAuthority('SCOPE_server')")会导致抱怨没有Authentication 对象,所以目前上面两个标注是注释掉的。
